Search This Blog

Monday, 20 December 2021

BPY SCRIPT TO DRAW A SPIRAL

The script will draw a spiral using the cube object which is repeatedly positioned along a spiral path. The spiral is visible in the Top ortho view(7).

-----------------------------------------------------------------------------------------------------------------------------

import bpy
from math import sin,cos,pi

bigdeg=pi*2
smalldeg=pi/100
radius=2
for i in range(0,500):
    x=radius*sin(smalldeg*i)
    y=radius*cos(smalldeg*i)
    z=0
    bpy.ops.mesh.primitive_cube_add(location=(x,y,z))
    bpy.ops.transform.resize(value=(1,1,1))
    mat_red=bpy.data.materials.new("red")
    mat_red.diffuse_color=(0.8, 0, 0)
    mesh=bpy.context.object.data
    mesh.materials.clear()
    mesh.materials.append(mat_red)
    radius +=.07
 
-----------------------------------------------------------------------------------------------------------------------------


BPY SCRIPT TO ADD MATERIAL TO AN EXISTING OBJECT.

To run this script open blender, add a cube object and select it.Copy and paste these codes into you text editor and run it to add a material to the cube. Here Red material(color) is added to the Cube.

-------------------------------------------------------------------------------------------------------------------------------

 import bpy

mat_red=bpy.data.materials.new("red")

mat_red.diffuse_color=(0.8, 0, 0)

mesh=bpy.context.object.data

mesh.materials.clear()

mesh.materials.append(mat_red)

-------------------------------------------------------------------------------------------------------------------------------

BPY SCRIPT TO POSITION AN OBJECT AT RANDOM LOCATION.

 The script below positions the monkey object at random position between _20 and +20 units along the X and Y axis. Along Z axis the location varies between -2 and +2 units.

----------------------------------------------------------------------------------------------------------------------------

'''POSITIONS MONKEY OBJECT AT RANDOM LOCATIONS BETWEEN -20 AND +20 UNITS ALONG X & Y AXIS, -2 TO +2 UNITS ALONG Z AXIS '''

import bpy

bpy.ops.object.select_all(action="SELECT")
bpy.ops.object.delete(use_global=False)


from random import randint
number=200
for i in range(0,number):
    x=randint(-20,20)
    y=randint(-20,20)    
    z=randint(-2,2)
    bpy.ops.mesh.primitive_monkey_add(location=(x,y,z))

----------------------------------------------------------------------------------------------------------------------------
  

Saturday, 18 September 2021

BRIDGE EDGE LOOPS


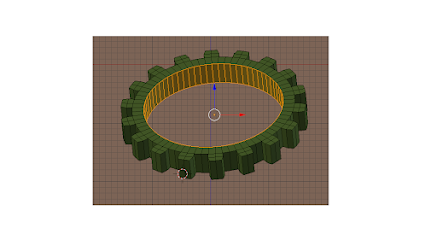
 Let us say we want to add  faces between the two edge loops in the gear shown in image 1 to get a final output as shown in image 2. We can use the Bridge Edge loops option to get this result.

STEPS
1. In Image -1, select the gear and go to edit mode. Set selection to Edge selection mode. Select an edge on one of the circular edge. Then on the 3D header, click on "Select" and then click on "Edge Loop". The complete circular edge will be selected.


                                                                Image-1

 
2. Holding Shift key down, click on an edge on the second circular edge, Click on "Select" and then click on "Edge Loop". Now both the circular edges would be selected.
3. Now on 3D header click on "Mesh" and then click on "Edge" and select "Bridge Edge Loop" in the popup menu. Now faces will be added between the two circular edges as shown in Image -2.


                                                                Image -2

 
4. Note this option  works only  if the two edges are part of a single object.

Thursday, 16 September 2021

DECIMATE MODIFIER

  Let us say we created a mesh object, but ended up with a lot more number of vertices than you think is the optimal number. To maintain the overall shape and still reduce the vertex count, decimate modifier can be used. The way to use it is explained below:

  Add a Monkey object and change to edit mode. In the info editor header the number of vertices is shown as 507. Change to solid mode. Having the monkey object selected, go to Properties Editor and click on the Modifier icon(Spanner), then click on Add modifier button.  In the drop down menu under "Generate" click on "Decimate". Under the "Collapse-Un-Subdivide-Planar" buttons,  "Ratio    1.0000" is visible  which is a slider control. Click LMB and drag to change the value from 1.0000 to say 0.700. Next click on Apply button. The number of vertices would have reduced to 360.

  As you reduce the ratio value, the vertex count will reduce, but beyond a point the details of the mesh shape will tend to be lost.


Tuesday, 14 September 2021

TO ANIMATE THE COLOR (DIFFUSE) SETTING OF THE CUBE


Blender 2.79b
Open a new Blender file with the default objects - A Cube, Camera and lamp.Set up the objects as per details given below.
Settings:

1. Cube- location 0,0,0, rotation to 0,0,0.
2. Camera- location, 7.5,-6.5,5.5 ,rotation 65,0,45.
3. Lamp- location  4,1,6 , rotation  40,0,110. on the  Properties Editor window set lamp  energy to 10 and   diffuse (RGB) value to 1,1,1.
4. View - Camera view by pressing 0 on the Numpad.
5. Viewport shading - Rendered - In the 3D window header.
6. Time line editor window-Set cursor (green line) at frame number 1. End frame to 100.

In 3D window select the Cube, then in  Properties Editor window,click on Material Properties icon, and then, in the Diffuse panel, click LMB on the color band which opens up a color selection wheel. Set the RGB value to 0,1,0.Click RMB a popup  menu will appear. Click on Insert keyframe. An yellow line appears at frame one indicating that a key frame is inserted. Now move the cursor to frame 100. Change the Diffuse color setting  to 0,0,1. Click RMB on the color band,in the popup menu , click on insert keyframe, a key frame will be inserted at frame 100. Now save the file.Position the cursor at frame number 1.

On the info Editor header, Click on "Render" and then click on "Render Animation". The animation will  be rendered. Once the rendering is done, click on "Render" once again and click on Play Animation. The light color of the Lamp will change from Red to Blue, as the cursor moves from frame 1 to 100.

 This effect will be visible with the color of the cube  changing from Green to Blue  due to the diffuse color being animated.

TO ANIMATE THE COLOR SETTING OF A LAMP

 TO ANIMATE THE COLOR SETTING OF A LAMP

Blender 2.79b
Open a new Blender file with the default objects - A Cube, Camera and lamp.Set up the objects as per details given below.
Settings:

1. Cube- location 0,0,0, rotation to 0,0,0.
2. Camera- location, 7.5,-6.5,5.5 ,rotation 65,0,45.
3. Lamp- location  4,1,6 , rotation  40,0,110. on the  Properties Editor window set lamp  energy to 10 and   diffuse (RGB) value to 1,0,0.
4. View - Camera view by pressing 0 on the Numpad.
5. Viewport shading - Rendered - In the 3D window header.
6. Time line editor window-Set cursor (green line) at frame number 1. End frame to 100.


In 3D window select the Lamp, then in  Properties Editor window,click on the Lamp icon, and then, below the Point lamp button, click RMB on the Red color band which opens up a pop-up menu. Click on Insert keyframe. An yellow line appears at frame one indicating that a key frame is inserted. Now move the cursor to frame 100. Change the color setting of the lamp to 0,0,1. Click RMB on the color band,in the popup menu , click on insert keyframe, a key frame will be inserted at frame 100. Now save the file.Position the cursor at frame number 1.

On the info Editor header, Click on "Render" and then click on "Render Animation". The animation will  be rendered. Once the rendering is done, click on "Render" once again and click on Play Animation. The light color of the Lamp will change from Red to Blue, as the cursor moves from frame 1 to 100.
This effect will be visible with the color of the cube  changing from Red to Blue due to animation of color setting of the Lamp.


ROUND EDGES- BEVEL TOOL

Blender version 3.6 To make any edge to be rounded smoothly, we can use the bevel tool in Edit Mode. Look at the cube in Image 1 where all t...